Showing posts with label Fire. Show all posts

Friday, November 27, 2015

Fire Log: November 27, 2015

Finally got a little extra time today to build a new fire pit and reflector for the Winter Bushcraft Shelter and play with some new kit.   I think the pit has the right orientation to the shelter now,  so the smoke blows away  or straight up.   My youngest son actually started the fire today with his fire steel and jute twine.   It takes him about 2 minutes to get a fire going,  not bad for an 11 year old.


New Pit & Reflector

BK 16 close up for Becker Fans


BK-16 makes amazing feathers and shavings for campfires.  This was a piece of Black Walnut ( We have a lot of these around here).


I also brought out the BK-5 today too,   because the new Becker needed company.


Sharpening Reflector Stakes


After chopping points on to the reflector support stakes,  shavings still curled off the Walnut.    Overall we still had a good time playing in the dirt!

Be safe and enjoy the season everyone!

Friday, November 20, 2015

My Gear: Cooking Pots


Next to knives, cooking gear is my largest bushcraft vice.  What else could explain a mental condition where a grown man will watch YouTube videos about billy cans?  Some say psychosis,  I say passion.

My first cook kit ever was one of those aluminum Scout kits,  you know the one with a wing nut holding the fry pan handle on and a tipsy pot.   Every one I've seen had melted pot lit handles and many dents.   These things had to be invented by scout moms intent on discouraging Cub Scouts from wanting to cook over a fire.

Fast forward to the 21st century and the really cool stuff, like stainless steel, titanium and Teflon coated aluminum.  Without even touching on the surplus market,  there are hundreds of great cooking pots.  However,  you can't carry all of it with out a pack mule and sounding like a Civil War Regiment on a road march.

Nessmuk  wrote about a lite weight five piece tin set and a camp kettle in his Woodcraft book.  Even then he stated he would not carry all five pieces on short trips.

  E.H. Kreps carried a No. 0 fry pan and a 1 quart small tinned pail with hay wire bail.  Aloung with a knife,  he felt these were sufficient for up to two people.

Horace Kephart,  when he did go lite,  listed a fry pan or army mess kit, large tin cup, quart pail, and a knife.

All three listed a pail or kettle among the cooking necessities.  The preferred size was 2 quarts or less. The other common item was a knife.   With this they could prepare food for the pan and pot and create other cooking tools as needed.   Unless they drank directly from the pot,  Nessmuk and Kreps must have had a cup of some sort when camping.

Thus we come to my typical bushcraft cook gear.   I like to carry a billy pot of some sort and a cup.  At least one knife is along in my gear,   more often more than one.   Additionally,  I carry a wood spoon I made,  not having time to make a new one every time I'm in the woods.
Steel Cup with Folding Handles


I have tried a few pots,  including home made billy cans,  and all have been adequate for boiling water or cooking.   My all time favorite is a IMUSA grease pot that I fitted with a bail.  It is a good size,  inexpensive, and lite weight.

Old faithful IMUSA Grease Pot
Next in line would be my GSI stainless Steel kettle.  I use this alot at my bushcraft shelter to making tea and coffee.   One could cook in it,  but it is not the best design for it.

GSI Kettle
I also have a large 1.6 Liter MSR Stowaway Pot.  This pot has a locking lid and is great for storing gear in a pack.  I use it when it is more than just me wanting something to eat.
MSR STOWAWAY on right

I recently purchased a Zebra 12cm pot that I have not tested out yet,  but have great hopes for this piece of cook ware.
New 12cm Zebra Pot
IMUSA (left) Zebra (right)

Frying pans and plates have not really been a priority for my packing list.  If I need a plate,  the pot lid usually suffices.  I really don't fry food much and any bread I usually make in the pot or on the coals.

That is what I currently use for my bushcraft cooking,  but camp cookware is right up there with knives.   I would love to see what everyone is using in their kit.

Keep Safe and Enjoy the Fall Season!


Friday, November 13, 2015

Fire Log: November 8, 2015 Making Char Cloth

This week I decided to make more char cloth for flint and steel fires.  Of course this means starting a fire with Flint and Steel of course.  It has taken some time to get proficient at making fires this way,  but it has quickly become my favorite method.

My kit

It took two strikes of the steel to flint to catch a spark,   this is a new record for me.  When I started using flint and steel it wasn't so pretty.

Spark caught in char

Things have been dry enough, that a handful of dead grass and golden rod tops made a quick birds nest.
Blowing into flame


Once you get the raw flame,  it is just a matter of continuing with your fire building routine.  It pays to have all your materials at hand and sorted by size.
Starting to catch flame

Going Good Now!

Making char cloth is straight forward.  I used an old flannel shirt this time,  but any natural material will do.  Stay away from any cloth that has synthetic fibers,  these just melt.  Cut up the cloth into squares and layer into the tin.

Cotton Cloth in a "Altoids" Type tin
Once you have enough cloth cut up,  close the lid and place it in the fire.  With this type of tin,  there is no need to punch a hole in the top.  The hinge allows enough gaps for heat and gas to escape from the tin.  Tighter lidded cans probably should have a nail hole in the top.
Smoke pouring out
Eventually smoke will start pouring out as the cloth cooks down.  This smoke will probably start burning as well.  When it looks like the smoke and flame are diminishing,  pull it from the fire and let it cool.  Keep it closed until you can touch it without burning your hands.

Finished Product
The finished product will be totally black,  at least in a perfect world.  A little brown doesn't really hurt anything.  I try to stay ahead on my char making,  but I also carry extra cotton cloth in a waterproof bag just in case.

As always,  I would like to hear how others do things or suggestions.  Please feel free to comment.

Monday, November 2, 2015

The Pocket Cooker

The Pocket Cooker Folding Steel Stove

Review:


Pocket Cooker folded on the included pouch
SPECIFICATIONS:
  • 6 1/2" x 3 3/4" x 1 1/8" folded
  • 8" x 6" open
  • Weighs 2 lbs.
  • Fuel: wood, paper, pine cones, bark, or whatever is at hand.
  • Cost under $20 delivered

     Compact and folding stove's come highly recommend for Bushcraft packs, Bug Out Bags, and alternate grid down cooking solutions.  These stoves do not use any bottled fuels, though diy alcohol stove's, trangia, and Sterno would work in them.  Mainly, these stoves would burn naturally occurring fuels such as wood, pine cones, bar or dried leaves.
There are several models, brands, and materials available commercially; just do a search on back packing stove's and you will see what I mean.  The D.I.Y. community has a load of ideas on making one from scratch.  Given the prices of Emberlit for example, I needed something more affordable.  Then I came across an advertisement for the Pocket Cooker.

   This stove is not made of some flimsy tin.  We are talking steel, thus the weight of 2 lbs.  It comes coated with a black paint from the factory, I think to protect from rusting during shipping. This paint disappears after the first use.  I thought maybe a coat of grill paint might be needed, but it hasn't rusted yet.  The heated metal evaporates any moisture from the surface and after cooling sufficiently is put back in the pouch.

     How does it work? Like dream!  Open it up and stuff a bunch of twigs and tinder into the top and fire it up.  Additional fuel can be added through a hinged door at one end.  It's that easy.
Stoked and fired up


     Timing a liter of water to boil was right around ten minutes, with plenty of heat and coals to warm hands and maybe even cook a hotdog over it.

Boils 1 Liter in about 10 minutes


The pocket cooker is very efficient burning twigs and small sticks.   The bottom of the stove consists of two perforated hinged plates that allow draft from under the stove.  In essence it becomes a modified rocket stove.

Floor Plates


Once you finish cooking or boiling, the fire quickly reduces itself to ashes.   This is easily knocked out the stove and scattered, leaving practically little evidence of the fire.   This is a big plus for no trace campers or OPSEC conscience folks.

Burning down to ash


The included pouch is made from machine sewn nylon with a sewn on belt loop.  A Velcro strip keeps the flap closed.  While, I haven’t bothered using the belt loop, the pouch is well made and keeps soot from getting over the rest of your gear.  Stored in the pouch, the stove would fit easily in a coat or cargo pocket, glove box or under a car seat.   Given the design, it will easily burn almost any dry combustible fuel scrounged locally from the environment.   An alcohol penny stove will fit inside, if one was so inclined. 

Front of Pouch


Belt Loop


What is the best part of this tough little stove?   The price!   I purchased this stove for less than $20 delivered to my house.  You might want to check out one for yourself, for the price you really can’t be disappointed.  Just remember  not to boil or cook when you first light up,  so the paint has a chance to burn off the metal.


Friday, October 30, 2015

Fire Log: October 30, 2015

Fire Log: October 30, 2015

Today, deciding to blow the cobwebs from my lungs and circulate blood cells,  I took a walk outback to scope for deer and turkey sign.  After coming across several scrapes, one doe and zero turkeys,  I headed down the mountain to my Bushcraft practice sight.  I think it's slick, with a tarp enclosed shelter, a few rustic sycamore log benches and a fire pit.  My practice sight isn't very remote, but it keeps me spirit while practicing woodscraft and survival skills.

Tarp Shelter


There wasn't a surplus of time, so I was limited to a quick brew of tea in my GSI kettle over the Pocket Cooker Stove.  Along the walk I scrounged a handful of dry branches, pine cones, and birch bark for fuel.    I got the fire going with a fire steel and Opinel #8 spine using a length of jute twine to catch the spark.


Collected fuel and folding stove ready to go


Lighting it up!

Just a little over fifteen minutes, had a hot cup of tea ready to go.  Even an hour of dirt time can be valuable.  It is my favorite season with plenty of opportunities to practice skills and maybe learn a couple more.


Till next time....enjoy the Fall.

Monday, March 2, 2015

Fire Kits: A philosophy of flame.

Fire is the most basic resource humans have on this planet.  Its been around for ever,  it can be life saving or destructive if not controlled or used properly.  Most of us navigate our day not even thinking about it in the least.  Cook our meals,  heat our homes, start our cars....all involve combustion.  It really is intertwined into every human life on the planet.  No matter how advanced humanity becomes,  we still need it.  Take it away and things start to come unglued fast!

Bushcrafters, campers, and other outdoor enthusiasts keep it in the back of their minds ( or least they should).   I keep a simple yet thorough kit in my pack when out in the woods,  and I always carry at least a couple methods of starting a fire where ever I go ( Bic lighter and ferro rod).   My kit includes a couple of dependable fire tinders that will light with a naked flame,  a large Army size Light My Fire Steel,  several lighters, matches, and a flint & steel kit.  I keep all of it in a homemade haversack that goes with me on my outings,  be it hiking, hunting, camping, or fishing.  It is more than a wilderness survival thing   I enjoy a small fire often to make coffee or tea at times and sometimes cook something, even when just out a day hike.  I find that building a cook fire adds meaning to some of these adventures.

The important thing  with a kit is knowing each item and how to use it.  Understanding your ability under different conditions, such as snow, wind, rain, or extreme dryness, is  obtained through practice.

The kit you put together has but one goal each and every time!


Sunday, February 22, 2015

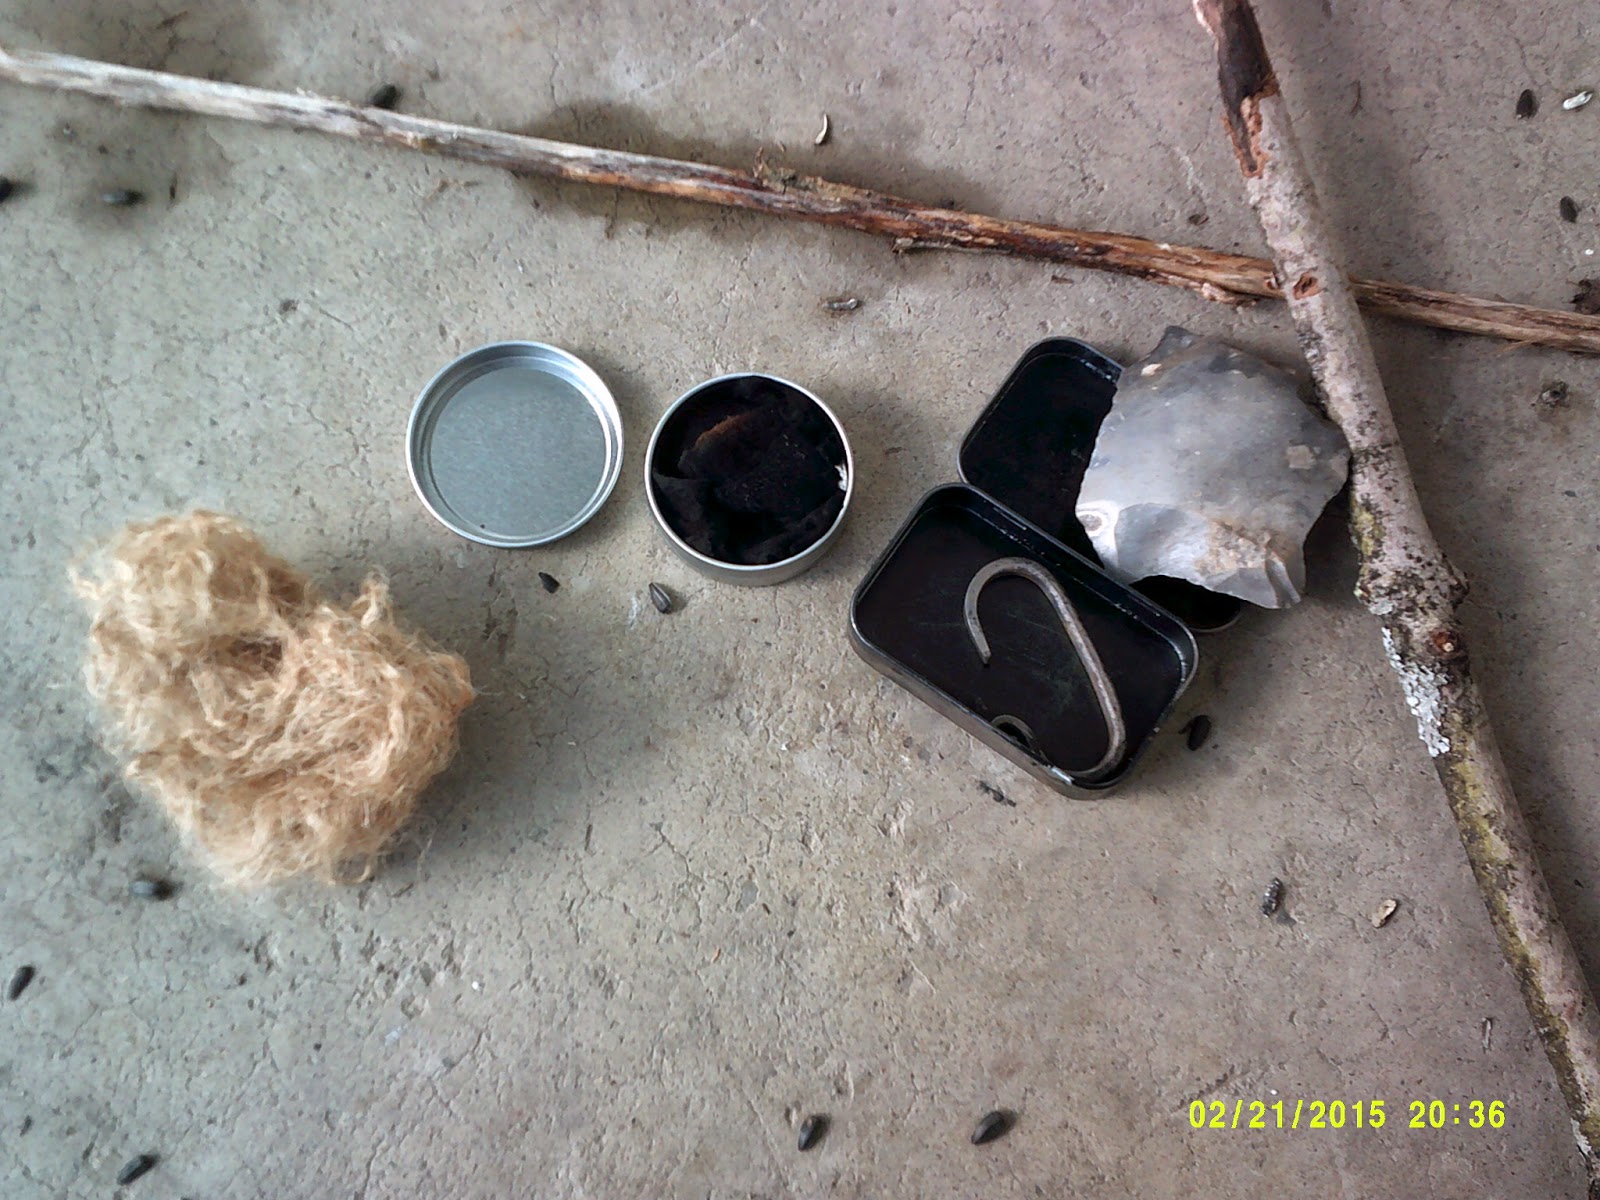
Deluxe Flint and Steel Kit from PrimitiveFire.com


I had previously put together a home made kit from an Altoids tin, a broken file, and chert from a Rail Road Track.  It is very functional and I have built a number of fires with it.  Last week I came across the above kit and thought I would give it a try.  Primitivefire.com had it to me in less than a week,  and I am thrilled with this kit.   The tins include an "Altoid" size one that held a bunch of cotton cloth for char material.  The smaller round tin is suppose to be used for making char cloth,  but I used the larger one.  The small on is very air tight and I felt it would probably blow apart in the fire.

The included flint is very large and sharp!  I think I could field dress a deer with this rock.  A nice length of Jute rope is included with the kit for making bird nests,  but I have been using my own stuff for that.


The steel striker is very nice,  throws a shower of sparks and fits comfortably over 3 fingers for striking.


I wish I could take pictures and make fires at the same time...but here are a few shots of a quick fire with this kit.

All laid out:


Spark Caught( in like 2 stikes)


In the Bird Nest


A few Breaths and POOF!


All in all it is a very sweet kit and I am going to have a lot of fun using it!